Sunday, April 28, 2024

Mexican Stew (WFPBNO)

I've made this recipe several times but this is the first time it's been WFPBNO. I used soy curls, which are compliant instead of a vegan meat substitute. I think it turned delicious and is definitely healthier. It has my favorite black bean and corn combo and the freshly roasted tomatillos give it that Mexican flair. If you can't find fresh one look for canned ones in the ethnic isle. Be sure your fresh tomatillos have a tight fitting husk and are bright green and firm.

  • 1-1/2 pounds fresh tomatillos, husks discarded, rinsed and quartered
  • 4 ounces soy curls, snapped into bite-sized pieces and rehydrated in water or broth
  • 1 large or 2 medium sweet onions, chopped (about 3 1/2 cups)
  • 1-1/2 tablespoons minced garlic
  • 1 ginormous jalapeno, halved, seeded and chopped 
  • 1 teaspoon dried oregano
  • 1 teaspoon cumin
  • 9 ounces frozen corn
  • 1 3/4 cups vegetable broth
  • 1 can black beans, rinsed and drained
  • 1/2 cup fresh cilantro, chopped
  • 2 teaspoons masa harissa

Heat broiler. Arrange tomatillos on a baking sheet covered with parchment paper. Broil 6 inches from heat until lightly charred, turning occasionally. This should take about 8 minutes.

Squeeze the soy curls to remove some of the liquid and drop them into a Dutch oven over medium heat. Continue until you've added all of the soy curls. Stirring occasionally until they are light brown. Remove to a bowl.

To the same Dutch oven add onion, garlic, jalapeno, oregano and cumin. Add a splash of water if needed to keep things from sticking. Cook about 3 minutes then add tomatillos, corn, broth, 1/2 cup water and the soy curls. Bring to a boil then turn to a simmer. Cook a few minutes, stirring occasionally.

Stir in beans, cilantro and masa. Stir and simmer uncovered until slightly thickened, about 5 minutes.

Serve with avocado, vegan sour cream and chopped onion if desired. Taste first, but I added a few splashes of Frank's hot sauce to my bowl.

This would be good with cornbread or even a warm tortilla.
Enjoy!!!

Sunday, April 14, 2024

Tempeh Bacon (WFPBNO)

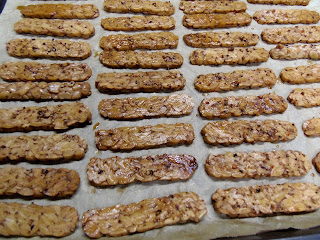
This is the best homemade bacon I've made. This makes a vegan bacon, lettuce and tomato sandwich a true joy. I am also going to make a BLT salad using these strips. But, I will cut them into smaller bite-sized pieces for a salad. You really should give these a try and remember tempeh is a fermented food so it's gut healthy!!!

  • 1 8-ounce package original tempeh, I use LightLife
  • 1/4 cup reduced sodium soy sauce
  • 2 tablespoons pure maple syrup
  • 1 teaspoon sriracha
  • 2 teaspoons liquid smoke
  • 2 teaspoons black pepper

Remove tempeh from packaging and cut in half. Place a small saucepan of water on to boil. Once boiling add tempeh and boil for 20 minutes.

Make the marinade while the tempeh is boiling. Set this aside for now.

Once tempeh has boiled, drain the water and set the tempeh aside to cool. To a container with a tight lid cover the bottom of your container. Cut the cooled tempeh into thin strips like bacon. Add these to the marinade and pour a little marinade over each layer. Cover and refrigerate overnight for the best flavor. Every time you go to the frig flip the container over so all of the tempeh gets a good amount of time in that marinade.

Line a large baking sheet with parchment paper. Preheat the oven to 400F. 

Place the tempeh on the baking sheet with a little space between each piece. Save that container of marinade.

Bake for 15-20 minutes. Be sure to check it at the 15 minute mark since all ovens are different. The last few minutes keep an eye on this so it doesn't burn. Now add the tempeh back to the container with the leftover marinade. Reheat in the toaster oven for a few minutes or microwave briefly. 

This is so damned good. I can't wait to have a BLT using this. You can taste the marinade before you add the tempeh to see if you want a little more heat, or smoky flavor.

Saturday, April 6, 2024

Stuffed Zucchini

These turned out so good and will definitely be made again. Just serve with a side salad and dinner is ready. This mixture could also be used to stuff acorn or yellow squash, bell peppers and maybe cabbage leaves. I didn't have my homemade cheese sauce and used Daiya cheese shreds. This is what kept this dish from being "whole food plant based no oil". So, don't be like me; plan ahead and have some cheese sauce ready to top these. Scooping out the inside of the zucchini is super easy if you have a melon baller utensil.
Let's make these stuffed zucchini!

  • 2 medium zucchini
  • 1 smallish sweet onion, chopped
  • 1 heaping tablespoon minced garlic
  • 1 small bell pepper, chopped
  • 1 can chickpeas, drained and rinsed
  • 1 heaping tablespoon tomato paste
  • 1 tablespoon hot sauce, I used Franks
  • 4-6 tablespoons unsweet plant-based milk, I used almond
  • 1 tablespoon garlic rice vinegar
  • 1 tablespoon reduced-sodium soy sauce
  • 1 teaspoon onion powder
  • 1 teaspoon coconut sugar
  • 1/2 teaspoon smoked paprika
  • 1/2 teaspoon ground cumin
  • 1/2 teaspoon chili powder
  • a few grinds of black pepper
  • 1/2 cup canned brown lentils (optional)*

Cut zucchini in half lengthwise. Scoop out the flesh leaving a little less than 1/2 an inch border. Chop up the scooped out parts.

In a large non-stick skillet heat a little water and add onion. Sauté about 4-5 minutes.

Add garlic, bell pepper, zucchini flesh, all the spices, soy sauce, vinegar, tomato paste, hot sauce and milk. Cover and cook about 10 minutes, stirring occasionally.

Preheat oven to 400F. Add the chickpeas and lentils to the skillet and cook for a few more minutes. You can leave the lid off so it thickens up. Taste and adjust spices if needed.

Line a baking sheet with parchment paper. Stuff each zucchini half with the chickpea mixture.

Add your cheese to the top.

Bake for 20-25 minutes. 

You can garnish with fresh herbs if you have them. Serve with a side salad for a delicious dinner.

* I had a 1/2 cup of lentils in the frig and added them to this so that they wouldn't go to waste. If you have a little bit of something that would fit this flavor profile fill free to add it. This is a great way to use up bits of veggies so they aren't wasted.

Enjoy!!!!!